[share url=”https://www.kontentino.com/blog/create-and-optimize-campaigns-in-fb-ads-manager/”]Share this with your network[/share]
But do you know all the nuts and bolts of optimizing your advertising campaigns on social media? Let’s check it, then! We’ve created a guide, enhanced with practical tips, about how to create and improve your Facebook Ads campaigns.
Business Manager vs Facebook Ads Manager
Before we start, it’s worth pointing out one slight detail: Business Manager is not a Facebook Ads Manager, and Facebook Ads Manager is not the same as Business Manager. Business Manager consists of a few subsystems, with Facebook Ads Manager indeed being the main part, but these two names shouldn’t be used interchangeably.
Facebook Ads Manager is a place where social media managers spend a lot of time, many of them calling it “the grey Facebook”.
Let’s check out how to tackle Facebook campaigns.
Facebook Ads Manager: create your campaign step by step
There are a few ways to access Facebook Ads Manager.
The quickest is to click on Create -> Ad (at the top right on Facebook).
https://www.facebook.com/ads/create/
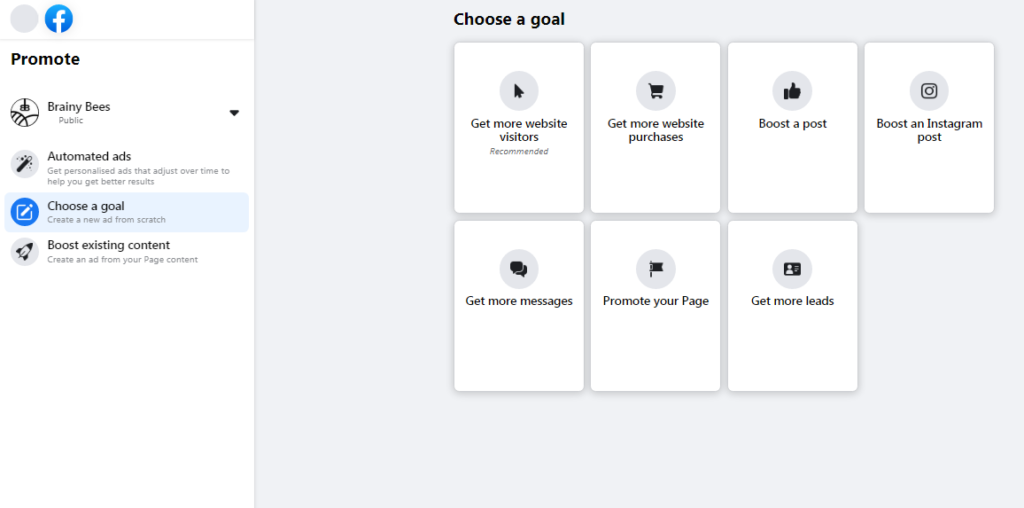
This one is a quick option that allows you to boost your Facebook posts. While you can choose some basic goals here and quickly boost your content, you don’t have access to advanced Facebook promotion options.
That’s why we would instead recommend creating campaigns via Facebook Ads Manager: https://www.facebook.com/adsmanager/.
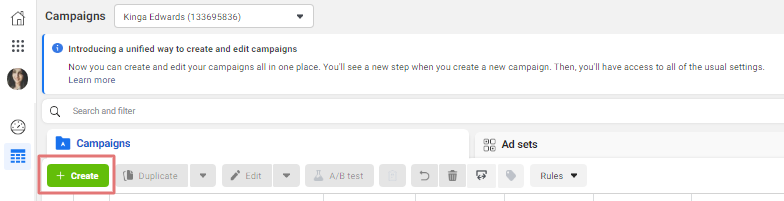
Once you click through, you’ll see a dashboard with your campaigns. If you haven’t run a campaign yet, the dashboard will be empty.
Kick off with the creation of a campaign by clicking on the green “Create” button. You’ll easily find it – it’s the only green button on there!
How to choose a FB campaign objective
Selecting the right goal of your campaign is crucial not only for its success but also for its set up. If you choose the wrong type here, some of the settings may not be available for you to use because they are reserved for particular campaign objectives.
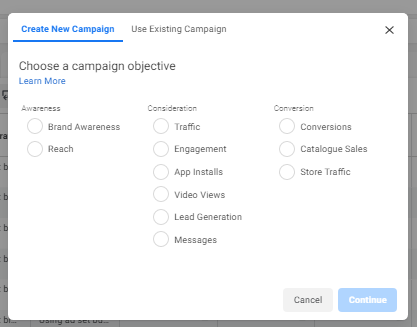
There are three main groups of objectives that you can choose from.
Awareness
- Brand awareness
- Reach
The Awareness objective is aimed at increasing the overall reach of your campaigns and showing them either to people who are the most likely to remember your ads (brand awareness goal), or just to the highest possible number of people (reach goal). This doesn’t mean it’s going to be reflected in reactions or clicks, but it’s likely that the reach, compared to other campaign objectives at your disposal, will be higher.
Consideration
It wouldn’t be too much of a stretch to assume that this group of objectives is the most selected by social media managers, and that’s due to its versatility. You have six campaign goals to choose from:
- Traffic – its aim is to drive traffic to the desired destination: a website, app, or Messenger conversation. Mainly used for CPC campaigns, as these metrics become easily trackable in Facebook Ads Manager upon choosing this campaign objective. It’s widely used for sending traffic to external websites, e.g. in the ecommerce industry.
- Engagement – its aim is to generate extra engagement in the form of Page Likes, Event Responses, or reactions (Post Engagement) like comments and shares. It’s used for getting more paid engagement in target groups on particular Facebook Page content and triggering more meaningful interactions.
- App installs – its aim is to reach people with the offer of downloading your mobile app. While you can use Engagement campaign objectives for promoting your app-related posts, the app installs goal clearly shows you how many people downloaded your app upon seeing your ad. You can either choose Automated app ads to drive and sustain campaign performance, or App ads to manually adjust and run your campaign.
- Video views – its aim is to attract more people to view your video ad. It focuses on generating the biggest view count among people who are the most likely to watch your ads. Therefore, the count may skyrocket but it won’t necessarily be proportional to the number of likes, comments and shares. If you care about video views only, this objective is probably the best way to promote your content.
- Lead generation – its aim is to bring people who are willing to fill in your embedded form on Facebook, then you can view the leads in your Business Manager (side note: it may be both very effective and very expensive!). Since users pay with their data for your resources (newsletters, e-books or whitepapers, just to name a few examples), you can use that base for further lead nurturing.
- Messages – its aim is to generate more message requests on either Messenger or Instagram direct. If you want to get in touch with your potential customer directly via messages, this campaign objective will support precise performance tracking.
Conversion
These objective campaigns are usually more advanced and tightly connected to ecommerce.
- Conversions – its aim is to be displayed to people who are most likely to take a desired action, e.g. complete a purchase or add payment info.
- Catalogue sales – its aim is to show catalogue products to your target audience (you need to add them to the catalogue first).
- Store traffic – its aim is to drive offline conversions, i.e. more people visiting brick-and-mortar stores.
Once you’ve picked your campaign goal, you’re good to go! You can change it afterwards, however keep in mind that some settings may reset, change, or completely disappear, depending on the chosen type.
And that’s the tree you’re going to see and move through. The new campaign dashboard will include Campaign budget optimization (covered below).
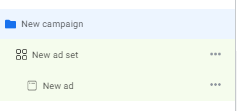
You can adjust your campaign names both at this stage and after the campaign is published, directly in the dashboard.
Commonly used methods are:
- Client_Goal_Differentiator for a campaign,
- Client_Goal_Differentiator_TargetGroup for ad sets,
- Client_Goal_Differentiator_TargetGroup_Differentiator for ads,
but you can work on your own system!
How to pick the right audience
The next step covers Ad Set settings, which is where you specify more details on a particular ad set being a part of your campaign. While you may have some additional settings (e.g. in terms of Traffic objective, you need to pick whether you want to send traffic to a Website, App, or Messenger conversation), the part that’s basically unchangeable is Audience.
At this stage, you can either create your target audience based on demographics, age, location, interests, and connections, or choose a pre-made target audience if you’ve created any before.
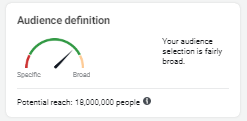
Depending on the specifics of the audience you’ve created, the number displayed in “Audience definition” will vary. Usually, having a fairly broad audience is considered to be great for reach, but may bring less satisfying conversion.
Once you get into Facebook Ads Manager, you’ll soon discover that it’s a game of trial and error, and that Audience Definition will also change depending on the chosen placements.
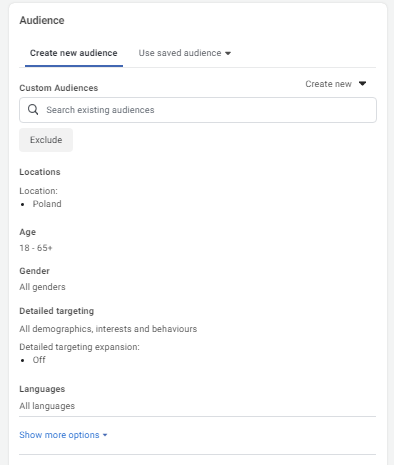
We’ve already covered Facebook Ads Target Audiences in one of our recent blog posts, so you should give it a read if you want to learn more.
How to adjust the budget in Facebook Ads Manager
You need to define your overall campaign budget in a Campaign preview, but then you can customize it in Ad Set (or several ad sets).
And we’re sorry to break it to you, but there’s nothing like a universal budget that will work regardless of the sector, niche, content, or goal.
For Campaign budget optimization, you need to specify what the total budget for all of your ad sets is. Facebook will try to distribute and optimize it to get the best results, but you can still keep an eye on it by adjusting ad sets manually.
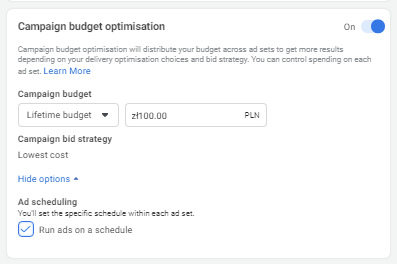
You have two options to choose from: lifetime budget or daily budget. And you might see many social media managers fighting about it. What works in favor of lifetime budget, though, is that this option enables scheduling ads in each ad set. This feature is unavailable for daily budget. We’ll cover it in a few seconds.
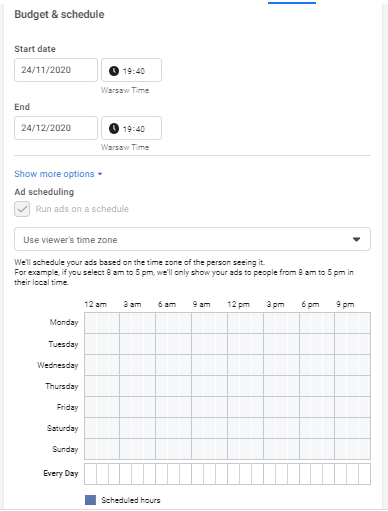
Moving forward to Ad set, this is where you need to set the scheduling and time range for displaying your ads. The time range can be extremely tricky as it’s often set up for a month by default. If you don’t check it and change the value manually to e.g. a week or two, it may take you long hours to realize that your campaign is not running properly but is spending money really slowly.
Scheduling may be really beneficial in a few cases, particularly:
- If you promote an offline store that’s only open for a few days a week and you don’t want to burn your marketing budgets at night or over the weekend, especially if your budget is rather limited.
- If you run an time-limited offer limited (e.g. a Black Friday deal) and you want to show it at a specific time (however, native Facebook settings may require you to keep it on for longer or turn it off earlier, as you can’t pick e.g. a single hour, and Facebook algorithms need time for review and learning).
- If your social media team only works on weekdays, you may want to turn off advertising over the weekend as no one will be able to handle the extra communication coming from paid content.
There are many advanced solutions connected to ad displays, e.g. automatic rules. With these, you can set up a formula that will turn off specific ad sets if they turn out to be unprofitable (e.g. if a CPC exceeds $1 or rapidly grows over time, you can set up a specific rule to turn it off without you interfering further).
Forever and for always: check your budget and ad accounts twice. Sometimes a slight change in your campaign resets your budget from a lifetime to a daily one, or you may find out after the ads are actually up and running that you set up the whole campaign on the wrong ad account. Always double-check it!
How to adjust placements
Selecting placements may be incredibly tricky even for seasoned social media managers, but rookies often fall for “recommended” automatic placements – and may see their money go quickly, without bringing results.
Choosing automatic placements gives you control over placements and often distributes content to places that are the most preferable for Facebook itself, e.g. to mobile devices or in-streams. We recommend spending a minute or two longer and choosing placements that can actually deliver your business goals.
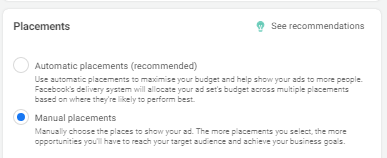
If you go for Manual placements (well done you!), you’ll have a few more options to select.
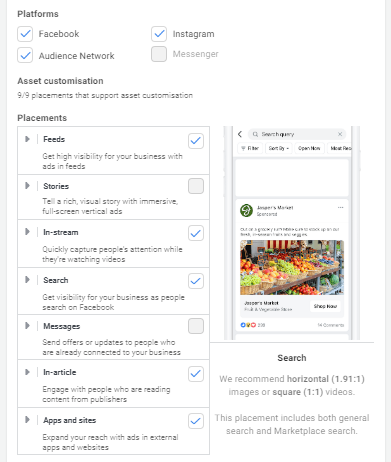
First of all, choose platforms. You can pick from Facebook, Audience Network, Instagram, and Messenger (for particular Campaign objectives).
Our advice is to keep as few placements as possible in a particular ad set. Why? If you choose them all, there’s a huge chance that Facebook will distribute your content mostly to Instagram, leaving only a few clicks or reactions on Facebook. If you want to promote your brand via ads on Instagram, it might be a better idea to do so through a dedicated Instagram ad set.
Facebook offers a few specific placements, including Feeds (usually the most expensive placement), Stories, In-Stream ads, Search, Messages, In-articles, and ads in Apps. While all of them have bigger or smaller potential, Feeds and Stories are the most popular choices among social media managers.
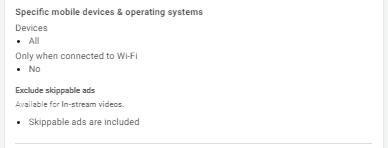
There’s also another trick here: specifying mobile devices and operating systems. In many cases, it can make no difference. However, if you promote a product for a specific mobile device or system (e.g. a mobile game), including the users of that device or system may help you avoid some misunderstanding or anger of those who can’t use your advertised product. Also, If your website is not mobile-friendly or requires a long form to be filled in, it may not be the best idea to promote it to mobile users.
You can only choose whether you want to show your ad to those who connect to Wi-Fi only, or if mobile data is fine. It might matter for e.g. longer video clips that will take a lot of data transfer and require a stable connection.
How to run your ad
Good job! Now you’re into ad creation: the last step of running your campaign.
First of all, you need to check what account will be used for promotion. Make sure to double-check before you kick your add of.
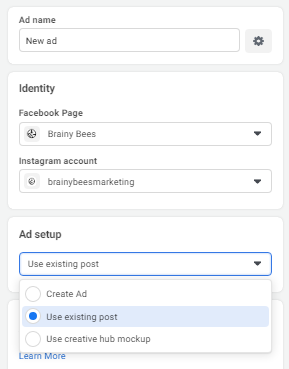
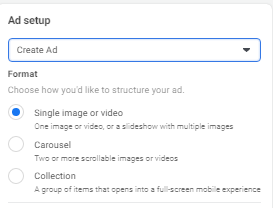
Then you’re given three options:
- Create Ad – you can create an ad from scratch here, adjusting the copy and resources on the go.
- Use existing post – you can use one of the posts that have already been published on your Facebook page.
- Use creative hub mockups – if you’ve prepared some mockups in a Creative Hub on Facebook, you can use them here.
Something that’s known to some social media managers is a technical glitch that Facebook doesn’t always show all of the posts that you’ve published, hence you can’t choose any of them for promotion.
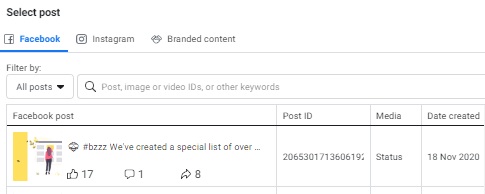
Fortunately, Facebook allows you to add a Post ID manually. Simply go to your Facebook Page, find the post you want to promote, and copy the share link. The number that comes after “/posts/” is your Post ID (e.g. https://www.facebook.com/brainybeesmarketing/posts/2065301713606192).)
Side note – Post ID is a really useful little thing on Facebook that may also be helpful when e.g. submitting an issue or getting in touch with Facebook support regarding your post, so it’s good to know how to find it.
If you don’t have a promotional post yet, you can make one right now.
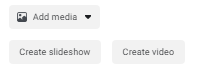
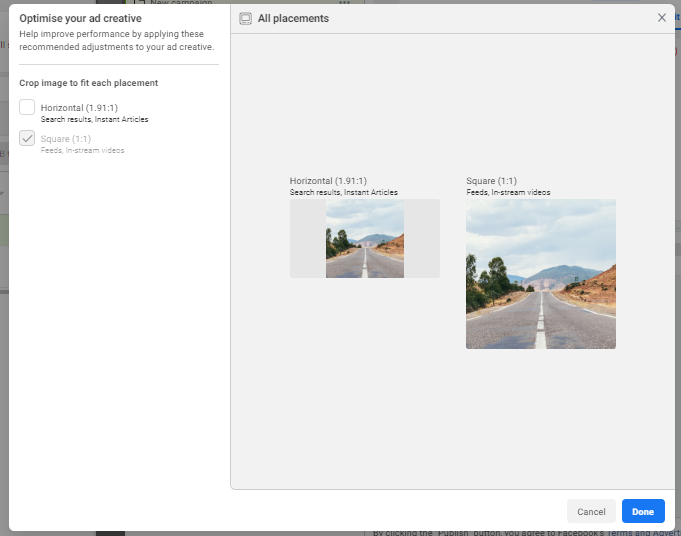
Firstly, add media to your campaign. It’s best to create a landscape (1.91:1 ratio) image with a centre part that can be easily cropped to a square, if required for various advertising formats. You can also create a slideshow or video out of your content. (Check our social media hacks for a detailed tutorial on how to do so).
The choice varies a little when it comes to other Campaign Objectives, e.g. Traffic. This is where you can pick not only a single image, but also create a Carousel or Collection to drive external traffic.
How does optimization of your ad creative look? You’ll have the option to crop it, but that’s all. If you want to modify your image or video, you need to do so beforehand. Our list of marketing tools may come in handy here.
Once you’re done with the creatives, you’ll see a few extra possibilities – such as creating an Instant Experience (a mobile format that you’ll be given a few templates to adjust to) or a playable source (if you are promoting your mobile app via a playable demo game, for example). Those options only refer to a certain group of ads, so in the majority of cases you may simply skip it.
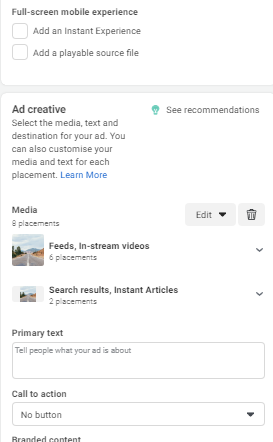
Let’s move on to your copy. These fields will also vary depending on the campaign objective you’ve chosen: for Post Engagement, you’ll only see the (part of the) form below.
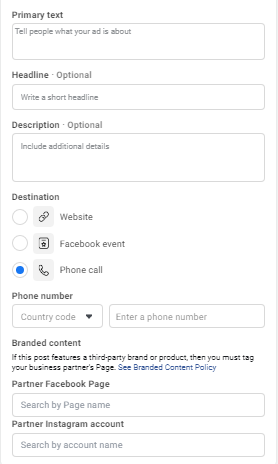
In Primary Text, you need to insert the actual copy of your post that is to be displayed above your content. Headline and Description are optional since they can be taken automatically from your content, but it’s always good to optimize them and come up with some new ideas. Facebook may unaesthetically cut some automatic headlines, so setting them manually saves you this hassle. What’s more, you could choose between a few varieties of your copy and let Facebook test them on its own.
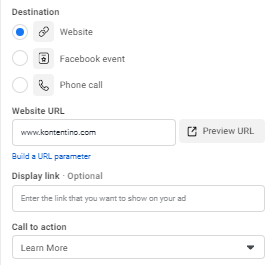
Then you need to choose the destination: a website, Facebook event, or phone call.
If you choose a phone call, you need to provide a number on which to contact you.
If it’s a Facebook event, you need to insert the URL of your event.
For a website, you’re given the option of not only adding your external URL but also adjusting the display link (e.g. if your link has UTMs in it or is simply long) and selecting one of almost 20 various call to action buttons, including Shop now, Learn more, See menu, or Subscribe.
If you want to tag a collaborating brand (e.g. you’re an influencer who has just been involved in a Worldwide retail campaign), you can do so using this feature.
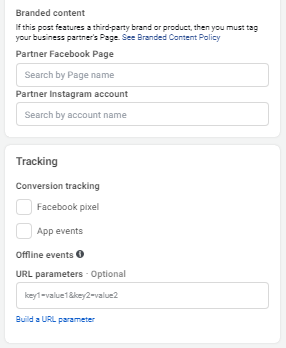
If you want to have even more control over your Facebook Ad campaign results, you can add conversion tracking options: Facebook pixel (requires set up on the website first) or special app events, e.g. putting a product in the shopping cart.
And that’s it!
Well, not quite yet. You need to publish your campaign, ad sets, and ads. To do so, simply click Publish.
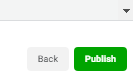
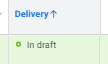
It doesn’t matter that your campaign is automatically published and is scheduled to start running in a matter of seconds. It has to go through a Facebook review first, which may take several hours (you’ll be notified if the campaign has been approved or rejected). If you want to run your campaign quickly, it’s better to leave it as a draft (Facebook saves your ad progress, so uncompleted campaigns will be saved to draft whenever you leave Ads Manager).
You can also schedule your campaign in advance by setting a time range in the future. For example, if you want to run a campaign on the 20th of December only, create it earlier and submit it for Facebook approval with the starting date of the 20th of December. This way, you’ll have your ad approved in advance so that it can be up and running exactly when you want. Don’t get confused, though – Facebook will send you a notification after approval that your ad has started running (or is scheduled), but it is actually waiting for its turn.
Anytime you want, you can edit your campaign, add new ad sets, or create new ads within them.
Well done! You’ve nailed it 🙂