Getting verified on Facebook means earning the blue checkmark badge next to your Page or profile name – confirming to every visitor that your account is authentic and officially recognized by Meta. Verification is free, open to Pages and profiles that meet Meta’s eligibility criteria, and takes under 10 minutes to apply for. The review itself takes between 48 hours and 45 days.
This guide covers exactly what Facebook verification means in 2026, why it matters for your brand, the complete 5-step process with screenshots, what to do if you’re denied, and how to grow your Facebook Page after you get the badge.
TL;DR: To get verified on Facebook, go to your Page Settings > General > Page Verification, then either request a phone call to your listed number (instant) or upload a qualifying business document (detailed). Your Page must be complete – profile photo, cover photo, filled “About” section, and at least one post – before you apply.
What Is Facebook Verification?
Facebook verification is the process by which Meta confirms that a Facebook Page or profile represents a real, authentic, and notable entity – a registered business, public figure, media brand, or creator. A verified account receives a blue checkmark badge displayed next to its name in search results, on the profile, and wherever the Page appears on the platform.
One important note for 2026: the grey checkmark badge no longer exists. Facebook previously awarded grey badges to businesses that didn’t meet the “public interest” threshold for the blue badge. Grey badges have been fully withdrawn. The only verification badge now available is the blue check.

Facebook verification (free, merit-based) is also separate from Meta Verified (a paid monthly subscription). Both result in a blue badge, but through very different processes. This guide covers the free verification route. If you want the paid route, see our Meta Verified guide.
Why Get Your Facebook Page Verified?
Reason 1: People are more likely to follow and trust a verified Page
When visitors see the blue checkmark next to your Page name, they immediately know they’re interacting with the real brand – not an impersonator or a fan page. In an environment where fake accounts are common, that authenticity signal builds trust before a visitor has read a single post.
That trust directly affects behavior. People follow verified Pages at higher rates, engage more willingly with their content, and are more likely to purchase from or contact a business they believe is legitimate.
Reason 2: Better visibility in search results
Verified Pages are prioritized in Facebook’s own search results and may receive more favorable placement in the News Feed for users who follow or have interacted with the Page. If someone searches for your brand name, your verified Page ranks above unverified copies or impersonator accounts.
There are also indirect SEO benefits beyond Facebook. A verified Facebook Page is an additional trust signal for search engines assessing the legitimacy of your brand, and it contributes to the broader ecosystem of consistent, verifiable brand presence across platforms. For more on how social media supports search visibility, see our guide on SEO and social media marketing.
Reason 3: Protection against impersonators
Fake accounts impersonating businesses are one of the most common forms of social media fraud. A verified badge makes it immediately clear which account is official, and gives you stronger grounds to report and remove impersonating Pages to Meta. For businesses running paid Facebook campaigns, impersonation is particularly damaging – fake accounts can divert potential customers to scam destinations.
Reason 4: Access to features and content prioritization
Verified Pages may get access to certain platform features and tools before they’re rolled out broadly. Meta has also indicated that content from verified accounts can receive preferential placement in reach and recommendations, though this isn’t guaranteed or consistent. The verification badge is, at minimum, a strong signal to Facebook’s systems that your Page is worth treating as a legitimate entity.
Facebook’s Verification Guidelines: Who Qualifies?
Before applying, your Page must meet four criteria that Facebook checks during review:
1. Be Authentic Your Page must represent a real, registered business or entity – or a real, identifiable person. Fan pages, parody accounts, general interest pages, and satirical accounts don’t qualify.
2. Be Complete Your Page must have an active, complete presence. This means: a profile photo, a cover photo, a fully filled “About” section (address, phone, website, description), and at least one published post. Incomplete Pages are declined almost immediately – don’t apply until every field is filled.
3. Be Notable Your entity must be widely searched and well-known. Facebook reviews Pages covered by multiple independent news sources. Paid content, press releases, and sponsored articles don’t count as references. Public figures, major brands, news organizations, and government entities qualify most easily. Smaller businesses can qualify if they have meaningful press coverage.
4. Be Unique Only one account per business or person can be verified, unless you operate separate language-specific Pages for the same brand. General interest accounts – Pages about broad topics rather than a specific person or brand – don’t typically qualify.
How to Create a Facebook Business Page Before Verifying
If you don’t have a Facebook Page yet, you need one before you can apply for verification. Creating a business Page takes about 10 minutes:
- Log into your personal Facebook account (required to administer a Page)
- Click “Pages” in the left-hand menu and select “Create New Page”
- Enter your business name, category, and description
- Upload your profile photo (your logo or a professional headshot)
- Upload your cover photo
- Complete the “About” section: address, phone number, website URL, business hours
- Publish at least one post before applying for verification
Your Page must be publicly visible before you apply. If it’s unpublished, go to Page Settings > General > Page Visibility and switch it to “Page published.”
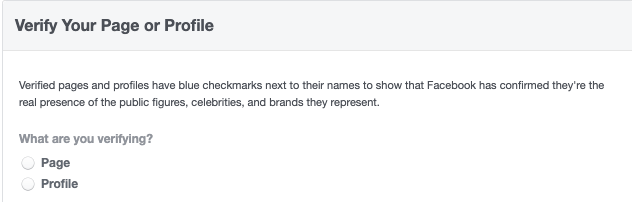
Step 2: Instant verification (phone call)
Facebook offers two verification paths. For the faster route, enter your business’s registered phone number and click “Call Me Now.” Facebook will call that number with a 6-digit verification code. Enter the code when prompted and submit.
This is the quickest method – if the phone number on your Page matches your registered business number, use this option.
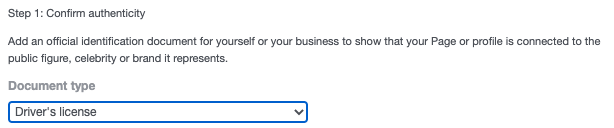
Step 3: Detailed verification (document upload)
If you prefer not to use phone verification, click “Verify This Page with Documents.” Upload a document that clearly shows your business name and address. Facebook accepts:
- Driver’s license
- Passport
- National identification card
- Tax filing documents
- Recent utility bill
- Articles of incorporation
The document must be current, legible, and show both your business name and address. Poor quality scans or expired documents are rejected.
Step 4: Add additional notability information
After completing phone or document verification, you’ll see an optional “Confirm notability” section. Fill this in – it significantly improves your chances of approval.
Include the following:
- A concise description of why your Page should be verified (keep it factual, not promotional)
- A description of the people who follow your Page and why they follow you
- All names your brand, person, or organization is known by
- Links to your Wikipedia page, official website, and relevant press coverage from independent news sources
Do not include paid content, sponsored articles, or promotional materials as references – Facebook explicitly states these won’t be considered.
Step 5: Submit and wait for the review
Once you’ve completed phone verification or uploaded your documents and filled in the notability section, submit your request. Facebook will review it and either approve or deny the application.
This process takes between 48 hours and 45 days. You’ll receive a notification when a decision is made. If approved, the blue checkmark appears next to your Page name immediately.
What to Do If Facebook Denies Your Verification Request
If Facebook denies your verification request, you can reapply after 30 days. Use that time to strengthen your application:
- Build press coverage from independent news sources – local news, industry publications, and trade media all count
- Ensure every field on your Page is complete and current
- Increase your posting frequency and audience engagement to demonstrate active presence
- Make sure your website clearly references your Facebook Page
- Check that your Page name exactly matches your registered business name
The most common reason for denial is insufficient notability evidence – Facebook can verify your identity but doesn’t have enough third-party evidence that your entity is widely searched or recognized. Solving that requires external press coverage, not just a well-optimized Facebook Page.
Facebook Verification vs. Meta Verified: What’s the Difference?
These are two separate programs that both result in a blue badge but work completely differently:
| Facebook verification (free) | Meta Verified (paid) | |
|---|---|---|
| Cost | Free | From ~$11.99/month |
| Process | Meta reviews for authenticity and notability | Identity confirmed via government ID |
| Who qualifies | Notable public figures, brands, media | Any eligible creator or business (18+) |
| Badge appearance | Blue checkmark | Blue checkmark |
| What it signals | Recognized as notable | Identity confirmed |
| Availability | Not guaranteed | Available to anyone who qualifies |
For smaller businesses and creators who don’t yet have significant press coverage, Meta Verified may be the more accessible path to getting a blue badge. For established brands and public figures, the free verification route is worth pursuing first.
How to Grow Your Facebook Page After Getting Verified
Getting the badge is one step. Growing your Facebook Page is the ongoing work. The verification badge helps with trust – but consistent content is what builds an audience.
Post on a consistent schedule Facebook’s algorithm rewards accounts that post regularly. Irregular activity causes your Page to lose visibility in followers’ feeds. Use a social media content calendar to plan content weeks ahead and maintain a steady publishing rhythm.
Prioritize video and Reels Video content – particularly native Facebook video and Reels – consistently gets the most organic reach on Facebook in 2026. If you’re only posting static images, you’re leaving reach on the table.
Engage with every comment Facebook’s algorithm heavily weighs how quickly and how often a Page responds to comments. Replying to comments within the first hour of posting signals activity to the algorithm and generates the kind of back-and-forth that boosts your post’s distribution.
Pair organic with paid Organic reach on Facebook averages around 5% of followers. Paid Facebook campaigns using lookalike audiences built from your existing followers are the most efficient way to reach new, relevant people beyond your current base.
Use a scheduling tool to stay consistent The single biggest predictor of Facebook Page growth is posting consistency. Kontentino’s Facebook management tool lets you plan, schedule, and auto-publish content across your Facebook Page alongside all your other social media accounts – with an approval workflow so nothing goes live without sign-off.
Start a 14-day free trial – no credit card required.
Frequently Asked Questions About Facebook Verification
How do I get verified on Facebook?
To get verified on Facebook, your Page must be authentic, complete, notable, and unique. Go to Page Settings > General > Page Verification > Edit > Get Started, then either verify via phone call (instant) or by uploading a business document. Add your notability information and submit. The review takes between 48 hours and 45 days.
What is Facebook Professional Mode?
Facebook Professional Mode is a setting for personal profiles that unlocks creator monetization tools, professional analytics, and extended audience reach without requiring a separate business Page. It doesn’t grant verification status on its own, but creators who build a notable following through Professional Mode may become eligible for traditional verification over time.
How long does Facebook verification take?
Facebook verification takes between 48 hours and 45 days. Simple cases with clear notability evidence may resolve in a few days. More complex or borderline applications can take the full 45 days. You’ll receive a notification on your Page when Meta makes a decision.
Is Facebook verification free?
Yes. The standard Facebook verification process is completely free. Facebook does not charge for reviewing or granting verification status. The paid alternative, Meta Verified, starts at approximately $11.99/month and grants a blue badge through identity confirmation rather than notability review.
What documents does Facebook accept for verification?
Facebook accepts: driver’s license, passport, national identification card, tax filing documents, recent utility bill, and articles of incorporation. The document must clearly show your business name and address and be current and legible.
Can a small business get verified on Facebook?
Yes. Facebook verification isn’t reserved for large brands or celebrities. Any business with an authentic, complete, notable, and unique Page can apply. The key requirement is notability – coverage by independent news sources. For smaller businesses with limited press coverage, Meta Verified may be the more practical path to a blue badge.
How do I create a Facebook business Page?
Log into your personal Facebook account, click “Pages” in the left menu, select “Create New Page,” enter your business name and category, add your profile photo and cover photo, complete the About section with your address, phone, and website, then publish at least one post. The whole setup takes about 10 minutes.
How do I publish my Facebook Page?
Facebook Pages are publicly visible (published) by default when created. If yours is unpublished, go to Page Settings > General > Page Visibility and switch it to “Page published.” Your Page must be published and have at least one post before you can apply for verification.
Why was my Facebook verification request denied?
The most common reason for denial is insufficient notability – Facebook can’t find enough independent news coverage or evidence that your entity is widely searched or recognized. Other reasons include an incomplete Page profile, a name mismatch between your Page and submitted documents, or a Page that doesn’t represent a specific person or business (general interest accounts don’t qualify).
Can I reapply for Facebook verification after being denied?
Yes. You can reapply after 30 days. Use the waiting period to build press coverage from independent sources, ensure your Page is fully complete, increase posting activity, and verify that your Page name matches your registered business name exactly.
How do I grow my Facebook Page after getting verified?
After verification, grow your Page by posting consistently (3-5 times per week minimum), prioritizing video and Reels for organic reach, engaging actively with every comment, using Facebook ads to reach new audiences, and using a scheduling tool like Kontentino to maintain consistent publishing without manual effort.
Does Facebook verification improve SEO?
Not directly – Facebook verification doesn’t change your website’s search engine rankings. But it creates indirect benefits: verified Pages rank higher in Facebook’s own search, receive more trust from visitors, generate higher engagement rates, and contribute to a consistent brand presence across platforms that search engines use as quality signals.